Among the multitude of features in iOS 5 is the ability to at last use custom sounds for alerts. Custom ringtones have been around for several years, but extending that feature to an iOS device’s other alerts, like voicemail or text messages, has been a feature long sought after by iPhone users. Until now, iOS device users have had to limit themselves to merely the limited—and often bizarre—tones offered by Apple.
COMPLETE COVERAGE


While Apple would probably prefer you buy alert sounds from the Tones section of the iTunes Store, with a little time and know-how you can make your own custom tones from any song or sound. Here’s how.
Step 1: Find your sound
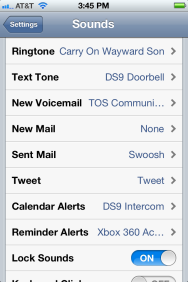
Tone it up: iOS 5 greatly expands the number of alerts you can set a custom tone for.
Picking the right sound is a matter of personal taste, but it’s worth considering the purpose of your custom tone. For example, you might love that latest hit single from your favorite band, but even a short snippet might be a bit long for a Calendar reminder. Nelson Muntz’s trademark laugh might be about the right length, but you might tire of hearing it every single time you get a new email.
However, there are a number of purposes to which you can now assign custom sounds, each of which may be suited to different kinds of tones. They include:
- Ringtone
- Text Tone (including iMessages and MMS)
- New Voicemail
- New Mail
- Sent Mail
- Tweet, Calendar Alerts
- Reminder Alerts
Also, iPads and iPod touches can take advantage of custom rings too, though their Ringtones are only triggered by FaceTime and their Text Tones by iMessage—neither has a New Voicemail alert, for obvious reasons.
Step 2: Edit your sound
If you are going to use a clip from a song, you’ll want to edit it down to 30 seconds or less. Other sounds might need some trimming too, to remove any extraneous material. For this task, you can pretty much turn to any consumer-level audio editor. GarageBand comes with every Mac and is well-suited for creating ringtones. Other audio editors, such as Rogue Amoeba’s Fission, will work quite well too.
Using GarageBand, you’ll want to create an iPhone Ringtone project (I started with the Example Ringtone that Garage Band provides); delete any pre-existing audio on the track by selecting the loop or sound clip and pressing the Delete key.
Now drag your sound file from the Finder into the recently vacated track. You’ll need to use DRM-free audio, so any older purchases from the iTunes Store or tracks from many other music services won’t work. However, just about every MP3 or M4A file should work fine. And don’t forget to do all of your work on a copy of the file so you don’t screw up the original.

Just a trim: You’ll probably want to cut your custom sound to somewhere between five and 15 seconds.
Choose the amount of your file you want as your sound—I recommend somewhere between a second and 15 seconds. (Honestly, 15 seconds is a lot longer than you think.) In Garage Band, position the playhead at the point you want your clip to end and choose Split from the Edit menu; then remove the portion of the audio you don’t want by selecting it and hitting Delete. Make sure you also drag your clip to the beginning of the track, unless you want a little silence before your sound starts. You might also want to add some space at the end, or a fade-out, which you can do by adjusting Garage Band’s track volume.
Step 3: Export
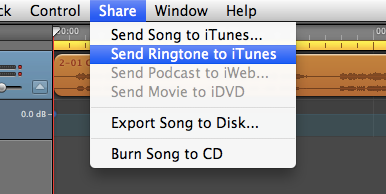
Share and share alike: Exporting audio as a ringtone is a snap from Garage Band.
When you’ve got your ringtone configured to your liking, go to the Share menu in Garage Band and choose Send Ringtone to iTunes. It’ll export the file to the Ringtones section of iTunes and play it back to you.
By default, your tone is called by the name of your Garage Band project file, but you can always rename it by selecting on it, choosing Get Info from the File menu, clicking on the Info tab, and filling out the Name field with whatever you like.
Step 4: Sync
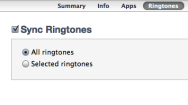
Sync it good: Make sure you’ve set up your iOS device to sync ringtones.
You’ll need to sync your iOS device with iTunes in order to load your ringtone on it. Just make sure that when you’re looking at the Ringtones section of your iOS device’s sync information in iTunes to either select All Ringtones or choose Selected Ringtones with your new sound checked off. Otherwise, it won’t transfer.
Step 5: Assign
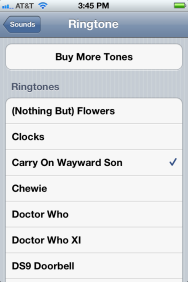
Set it and forget it: Choose your new ringtone in Settings -> Sounds and get ready to rock out.
Your ringtone has been created and synced—now for the easy part! Navigate to Settings -> Sounds on your iPhone or iPod touch (or, on your iPad, Settings -> General -> Sounds), and tap on the alert sound you wish to change.
Now scroll to your newly-created sound—it’ll be listed under the Ringtones section, but don’t worry; you can use it for any of your alerts. Tap it and your iOS device will play it back once, just so you remember what you’re getting into, and that’s it.
If you want to make more custom alert tones, just rinse and repeat.
[Dan Moren is a senior associate editor for Macworld.]